![]()
![]()
![]()
![]()
![]()
![]()
![]()
![]()
![]()
![]()
![]()
![]()
![]()
![]()
![]()
![]()
![]()
![]()
![]()
![]()
![]()
![]()
![]()
![]()
![]()
![]()
![]()
![]()
![]()
![]()
![]()
![]()
![]()
![]()
![]()
![]()
![]()
![]()
![]()
![]()
![]()
![]()
![]()
![]()
![]()
![]()
![]()
![]()
![]()
![]()
![]()
![]()
![]()
![]()
![]()
![]()
![]()
![]()
![]()
![]()
![]()
![]()
![]()
![]()
![]()
![]()
Instructions for assembling the Angled Velocity
stacks,
Photo Etch tray and Mesh. AZMP M23 1207
The Photo Etch sheet is fairly self explanatory, if you are used to PE items. (Click on images for a larger view)
You will receive the PE sheet
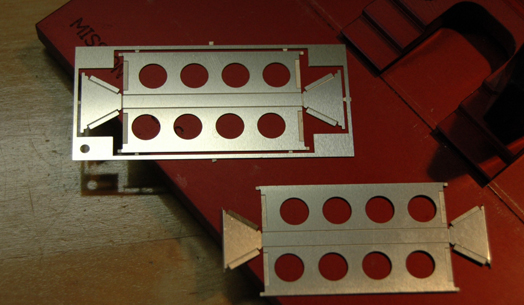 which obviously you will have to trim from the sprue. (If you
need a replacement just email us) Then fold and glue. It should
which obviously you will have to trim from the sprue. (If you
need a replacement just email us) Then fold and glue. It should
look something like this when finished
.jpg)
Also included in the set is a piece of Stainless Steel
mesh and a template for it.
![]()
Cut the template out and place it on the mesh so you can
see the lines through the mesh.
.jpg) Attach it to the mesh with scotch tape
Attach it to the mesh with scotch tape
.jpg)
and mark the lines on the mesh with a black felt tip marker. Then cut the mesh
to the size of the template
.jpg) not forgetting to cut out the
not forgetting to cut out the
relief's at the corners
.jpg) This is what you should end up with.
This is what you should end up with.
With the lines on the bottom make the first fold with your
fingers down the middle.
.jpg) Then, with some good flat tweezers, pinch the fold tight.
Then, with some good flat tweezers, pinch the fold tight.
.jpg) The tweezers I use for this are from "Tweezerman". You will find them in Beauty
Stores. Not cheap but really good. Pinch along the
The tweezers I use for this are from "Tweezerman". You will find them in Beauty
Stores. Not cheap but really good. Pinch along the
other fold lines, at which point you will be ready to use the "buck" to finish
it off.
.jpg)
Fit the mesh around the buck
.jpg) identify the "top" and "back", of the press, which is scribed in the top
identify the "top" and "back", of the press, which is scribed in the top
.jpg) and slide it over the mesh
and slide it over the mesh
and "buck" until it is firmly seated at the bottom of the "buck".
.jpg) Use tweezers to fold the edge of the edge of the mesh flat.
Use tweezers to fold the edge of the edge of the mesh flat.
.jpg)
Then use the tweezers again to fold the mesh at 90 degrees to the "buck"
.jpg)
.jpg) Remove the mesh from the buck, and with a
Remove the mesh from the buck, and with a
small drop of superglue, glue the front flap in place.
.jpg) Now you can fit the mesh on the Photo Etch tray you assembled. Using the
tweezers
Now you can fit the mesh on the Photo Etch tray you assembled. Using the
tweezers
again, carefully, push the mesh around the tray flange and squeeze tight all
around. Don't worry about excess mesh, at the bottom, at this point. When
you are satisfied you have a good fit, "wick" a little water thin superglue
around the flange. Once this is set trim the excess mesh from the bottom. I used
a "drimel" with a diamond wheel disc to trim it and this is how it came out.
.jpg) As long as you folded the tray correctly and installed the angle
As long as you folded the tray correctly and installed the angle
stacks correctly, the tray will just drop into place with a perfect fit.
Don't worry if the mesh does not look perfect when folded. It never did in the 70's on the car either. ;)
I hope this has been of help.
Mac